Creating your own board game cards has never been easier than it is in 2025.
Whether you’re a game designer working on prototypes or someone who wants to print custom cards for family game night, knowing how to print board game cards properly can save you hundreds of dollars compared to professional printing services.
I’ve helped thousands of game creators bring their ideas to life through DIY card printing. And in this guide, as a professional custom board game manufacturer, I’ll show you exactly how to create professional-looking board game cards right from your home office.
The best part?
You don’t need expensive equipment or years of design experience to get started.

Why Print Your Own Board Game Cards?
Before we dive into the step-by-step process, let’s talk about why printing your own cards makes sense.
Cost Savings
Professional card printing services typically charge $200-500 for small batches. When you’re just testing game mechanics or creating prototypes, that’s a huge expense.
With home printing, you can create 100+ cards for under $20 in materials.
Speed and Flexibility
Need to test a rule change? With home printing, you can have new cards ready in 30 minutes instead of waiting weeks for a print shop.
Creative Control
You control every aspect of the design, quality, and timing. No more dealing with print shop minimums or waiting for proofs.
What You’ll Need to Get Started
Here’s everything required for professional-quality card printing at home:
Essential Equipment
- Home printer (inkjet or laser)
- Cardstock paper (220-350 GSM)
- Paper cutter or rotary trimmer
- Metal ruler
- Self-healing cutting mat
Optional Upgrades
- Laminator (for extra durability)
- Corner rounder
- Card sleeves
- Double-sided tape or glue stick
The total investment? Around $100-150 for equipment that’ll last years.
How to Print Board Game Cards
Step 1: Design Your Cards
Before you can print anything, you need properly formatted card designs.
Choose Your Card Size
The most common card sizes are:
- Poker size: 2.5″ x 3.5″ (standard playing cards)
- Tarot size: 2.75″ x 4.75″ (larger, easier to read)
- Mini cards: 1.75″ x 2.5″ (space-saving option)
Pro tip: Stick with standard sizes. It makes everything easier – from design templates to card sleeves.
Design Software Options
You don’t need expensive software. Here are three solid options:
Canva (Easiest)
- Pre-made card templates
- Drag-and-drop interface
- Works in your browser
GIMP (Free)
- Full design control
- Supports high-resolution images
- Steeper learning curve
Adobe Photoshop (Professional)
- Industry standard
- Advanced features
- Monthly subscription required
Critical Design Rules
Resolution: Always design at 300 DPI minimum. This ensures crisp, professional-looking prints.
Bleed Area: Add 0.125″ bleed around your design. This prevents white edges when cutting.
Safe Zone: Keep important text and graphics 0.25″ from card edges.
Step 2: Choose the Right Printing Materials
This is where most people mess up. The wrong paper choice can make your cards look cheap and unprofessional.
Cardstock Weight Guide
220 GSM: Minimum for game cards. Still feels thin but functional.
270 GSM: Sweet spot for most home printers. Good durability without jamming.
350 GSM: Premium feel, but check your printer specs first.
Here’s the thing: heavier isn’t always better. I’ve seen too many people buy 400+ GSM cardstock only to have it jam their printer constantly.
Paper Finish Options
Matte Finish
- Reduces glare
- Easy to write on
- Less fingerprint-prone
Glossy Finish
- Vibrant colors
- Professional look
- Shows fingerprints easily
For game prototypes, I recommend matte finish. It’s more practical for repeated handling.
Printer Compatibility
Inkjet Printers: Work with most cardstock weights. Colors are vibrant but can smudge if not dried properly.
Laser Printers: Handle heavy cardstock better. Toner won’t smudge, but color quality varies.
Step 3: Print Setup and Settings
Getting your printer settings right makes the difference between amateur and professional results.
Page Layout
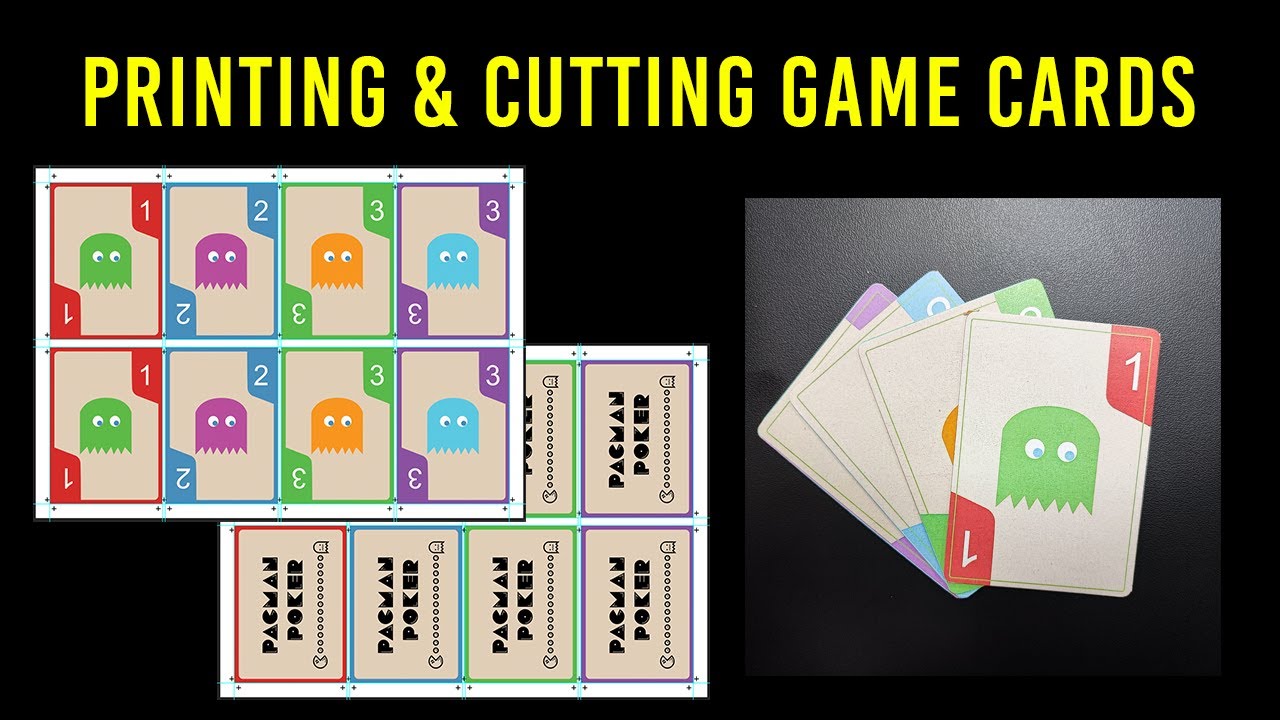
Multiple Cards Per Sheet: Arrange 6-9 cards per 8.5″ x 11″ sheet for efficiency.
Crop Marks: Include cutting guides to ensure straight, consistent cuts.
Color Calibration: Print a test page first to check color accuracy.
Printer Settings
Paper Type: Select “Cardstock” or “Heavy Paper”
Quality: Choose “High” or “Best”
Color Management: Use “Printer Manages Colors”
Double-Sided Printing
Want cards with different fronts and backs? Here’s how to do it right:
- Print all card fronts first
- Let ink dry completely (15-20 minutes)
- Flip paper and feed through printer again
- Print card backs
Critical: Do a test run with 2-3 cards before printing your entire batch.
Step 4: Cutting Your Cards
This step separates the pros from the amateurs. Sloppy cutting ruins otherwise perfect cards.
Tools That Work
Paper Cutter: Fast but limited precision. Good for straight cuts only.
Rotary Trimmer: My personal favorite. Clean cuts with minimal pressure.
Craft Knife + Ruler: Most precise but slowest method.
Cutting Technique
- Mark your guidelines using crop marks
- Cut in batches of 5-10 sheets maximum
- Use steady pressure – don’t rush
- Check alignment frequently
Pro tip: A sharp blade is everything. Replace craft knife blades after every 50-100 cuts.
Step 5: Finishing Touches
Raw-cut cards look homemade. These finishing techniques make them look professional.
Corner Rounding
Round corners prevent damage and give cards that authentic playing card feel.
Corner Punch: Manual tool, consistent results
Corner Rounder: Faster for large batches
Templates: Trace and cut by hand (time-consuming)
Lamination Options
Individual Lamination: Covers each card separately. Extremely durable but thick.
Sheet Lamination: Laminate entire sheets before cutting. Thinner profile.
Card Sleeves
The easiest way to protect your cards without changing their feel:
- Standard sleeves: 66mm x 91mm for poker-sized cards
- Premium sleeves: Thicker, more durable
- Matte sleeves: Reduce glare and shuffling noise
Advanced Techniques
Once you’ve mastered the basics, these techniques will take your card printing to the next level.
Creating Card Backs
Generic backs look amateur. Here’s how to create professional card backs:
Pattern Design: Simple, repeating patterns work best
Brand Elements: Include your game logo or theme
Symmetry: Ensure the design looks good regardless of orientation
Waterproof Cards
For games played outdoors or with drinks nearby, waterproof paper is a game-changer.
TerraSlate waterproof paper works with most home printers and creates truly waterproof cards. Expect to pay 3-4x more than regular cardstock, but the durability is worth it for finished games.
Professional-Quality Templates
Create reusable templates with:
- Consistent margins
- Automatic crop marks
- Standard card sizes
- Brand elements
This saves hours on future projects and ensures consistency across your entire game.
Troubleshooting Common Problems
Print Quality Issues
Blurry Text: Increase DPI to 300 or higher
Color Mismatches: Calibrate your monitor and printer
Ink Smearing: Let prints dry completely before handling
Paper Jams
Too Thick: Try lighter cardstock (220-270 GSM)
Wrong Settings: Ensure printer is set to “Cardstock” mode
Feeding Issues: Fan paper before loading, adjust guides
Cutting Problems
Uneven Cuts: Use a metal ruler and sharp blade
Rough Edges: Replace dull cutting blades immediately
Alignment Issues: Create better crop marks in your design
Cost Breakdown: DIY vs Professional
Let’s talk numbers. Here’s what it actually costs to print board game cards in 2025:
DIY Costs (100 cards)
- Cardstock: $8-12
- Ink/Toner: $5-8
- Sleeves (optional): $6-10
- Total: $19-30
Professional Printing (100 cards)
- Basic quality: $150-250
- Premium quality: $300-500
- Rush orders: +50-100%
The savings add up quickly, especially during the prototype phase when you’re printing multiple iterations.
When to Go Professional
Sometimes professional printing makes sense:
Large Quantities: 500+ cards often cost less per unit professionally
Distribution: Retail games need consistent, high-quality printing
Special Materials: Linen finish, spot UV, embossing
Time Constraints: Need thousands of cards quickly
But for prototypes, small batches, and custom games? Home printing wins every time.
Final Thoughts
Learning how to print board game cards at home opens up incredible creative possibilities. You can iterate quickly, test new ideas, and create custom games without breaking the bank.
The key is starting simple and gradually improving your process. Don’t try to master every technique at once.
Start with basic cardstock printing, get comfortable with the workflow, then add advanced techniques like lamination or corner rounding.
Your first batch won’t be perfect – and that’s okay. Every game designer I know has a drawer full of wonky prototype cards from their early days.
The important thing is getting started and learning through practice.
Ready to print your first set of cards? Grab some cardstock, fire up your printer, and start creating. Your next great game idea is just a print job away.


