
Playing board games with family and friends is always a blast. And if you’re looking for a fun and easy game to play, Sequence is a great option.
Sequence is a simple yet strategic game where you try to get 5 chips in a row on the board before your opponent does. It’s fun for all ages and can easily be made at home.
In this step-by-step guide, as a professional board game manufacturer, I’ll show you how to make your very own Sequence board game from scratch.
How to Make Your Own Sequence Board Game
Step 1: Gather Your Materials
To make your Sequence board, you’ll need:
- A deck of cards
- Scissors or paper cutter
- Ruler
- Pencil
- Hot glue gun + glue sticks
- Foamcore board or wooden board (at least 15 x 15 inches)
- Clear acrylic sheet (at least 15 x 15 inches)
- Paint and paintbrushes (optional)
- Corner protectors (optional)
I recommend using foamcore since it’s affordable and easy to cut. But you can use any rigid material like wood or thick cardboard.
The acrylic sheet will act as a clear cover to protect the cards on the board.
Step 2: Cut Out Card Pieces
Grab your deck of cards and start slicing!
You’ll need to cut out the corner of each card, leaving about a 1-inch square corner piece. Cut all cards except the jacks.
Pro tip: Use a paper cutter for clean, straight cuts.
Cut out corner pieces of cards
Cut out corner pieces of cards to create the placeholders
Once you’ve cut up all the cards, set aside the corner pieces. Don’t lose them!
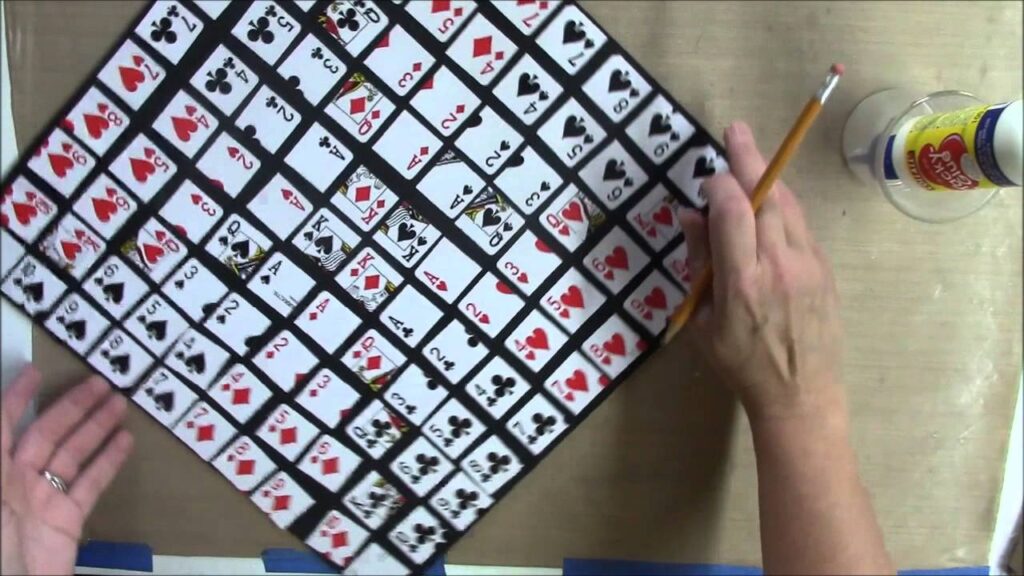
Step 3: Arrange Corner Pieces on Board
Now comes the fun part – laying out your Sequence board.
Start by measuring and marking a 10 x 10 grid of 1-inch squares on your board material.
Then arrange the card corner pieces in a specific order on the squares, using this layout:
Sequence Board Layout
Use this layout to correctly position the card placeholders
Glue each corner piece down as you place them. I recommend using hot glue for a strong bond.
Be sure to leave the four corners empty – these count as open spaces that either player can claim.
Step 4: Add Clear Cover (Optional)
While technically optional, I highly recommend adding a clear acrylic sheet on top of your Sequence board. This protects the cards and gives your board a smooth, polished look.
Carefully position the acrylic sheet over your board and secure it using corner protectors attached with screws or more hot glue.
You could also tape down the edges with a strong packing tape. Just don’t tape over the card pieces.
Step 5: Paint and Decorate (Optional)
If you want to spice up your Sequence board, add some color!
You can paint the wood or foamcore base before gluing down cards for a more dynamic background.
Some ideas:
- Paint alternate squares different colors
- Stencil fun shapes or patterns
- Use painter’s tape for clean lines
You can also decorate the blank spaces around the board or edges with any design elements you like. Here are a few ideas:
- Add the Sequence logo
- Draw club/spade designs
- Glue extra card suit pieces
- Attach game instructions
Get creative and make it your own!
Game Materials You’ll Need
A homemade Sequence board is only one part of the game.
To play, you’ll also need:
- 2 decks of cards: Standard 52-card decks, with the jacks removed
- Chips/markers: Glass stones, poker chips, or other small markers for each player. You’ll need at least 15 markers per player. Different colors help distinguish each player’s pieces.
And that’s it!
Shuffle the decks together and deal 7 cards to each player to start the game. Players take turns placing down cards on the board and covering the corresponding space with their chip.
First to make a sequence of 5 chips in a row wins!
Customization Ideas
Part of the fun of a homemade Sequence game is customizing it to suit your style.
Here are some ways to make your Sequence board unique:
Use photos instead of cards
Print out wallet-sized photos of friends or family members. Cut off the corners and use the photo corners instead of card corners to mark the spaces. Great for a personalized gift!
Make a travel-sized board
Downsize your Sequence board to make it portable. Use cardstock instead of foamcore so you can roll it up. Mini poker chips work great for travel markers.
Create a themed board
Spice it up by giving your Sequence board a fun theme. Use tropical or Christmas images in place of the card corners. Or paint your board to look like a Hogwarts chess board!
Troubleshooting Issues
Most issues with homemade Sequence boards come down to the cards not sticking or popping off over time.
To prevent this:
- Use hot glue and apply a generous amount on each card corner
- Add weight on top as the glue dries to reinforce the bond
- Seal the edges with packing tape or self-adhesive laminate for extra protection
The acrylic sheet on top also helps cards stay in place once the game is fully assembled.
And there you have it – everything you need to know to create your own Sequence board game right at home. Grab some friends and get ready for hours of strategic (and addicting) fun!
Let me know if you have any other questions down below. And if you make your own Sequence board, share a photo! I’d love to see your creation.


